

Cleaning the laser source
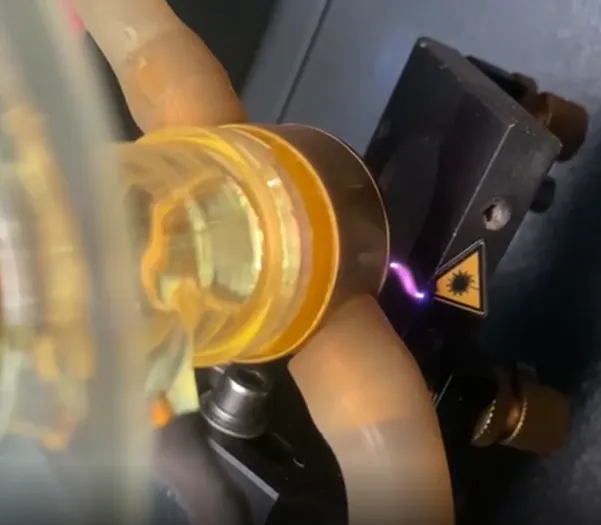
Dust and dirt on your laser source exterior conduct electricity and create serious safety hazards. Regular cleaning prevents electrical arcing, fire risk, and maintains laser performance.
Why cleaning is critical
Section titled “Why cleaning is critical”Dust and dirt on the laser source conduct electricity. Instead of flowing through the laser source to create a beam, electricity can arc across the dirty exterior from plus to minus. This creates:
- Fire hazard at the laser source
- Electrocution risk for operators
- No laser beam (power flows outside instead of through the source)
- Reduced performance and premature failure
How often to clean
Section titled “How often to clean”Cleaning frequency depends on:
- Materials you process (wood creates more visible dust)
- How often you use the machine
- Workshop environment (dust levels)
Establish your cleaning schedule:
- Start with 2 week intervals for the first cleaning
- Clean only half the source (e.g., front half) to compare
- After 2 weeks, inspect:
- Heavy buildup = clean weekly
- Light buildup = clean monthly
- Adjust schedule based on your specific conditions
Required materials
Section titled “Required materials”- Latex or nitrile gloves (required)
- Lint-free cleaning paper or paper towels
- 70% isopropyl alcohol in spray bottle
- Allen key set (to access laser source)
Safety preparation
Section titled “Safety preparation”Before you begin:
- Turn off the laser machine completely
- Unplug the machine from power
- Wait at least 24 hours for the laser source to fully discharge
- Put on gloves before touching the laser source
Why gloves are required: Fingerprints contain oils that conduct electricity. Fingerprints on the laser source create conductive paths for electricity to arc along, creating a dangerous situation.
Cleaning procedure
Section titled “Cleaning procedure”Step 1: Remove loose dust
Section titled “Step 1: Remove loose dust”- Put on latex gloves
- Use dry cleaning paper to gently remove loose dust from the laser source exterior
- Work carefully around electrical connections and glass components
Step 2: Deep clean with alcohol
Section titled “Step 2: Deep clean with alcohol”- Spray alcohol on the laser source exterior
- Wipe with dry cleaning paper to remove all remaining dust and residue
- Check all surfaces are completely clean
Step 3: Final alcohol treatment
Section titled “Step 3: Final alcohol treatment”- Spray alcohol on the laser source once more
- Let alcohol air dry (do not wipe)
- Inspect for fingerprints and ensure none are visible
While you’re there: Additional checks
Section titled “While you’re there: Additional checks”Since you have the laser source accessible, perform these additional inspections:
Check the output lens
Section titled “Check the output lens”At the front of the laser source (tapered end), there is a lens. Inspect it while the machine is unplugged and discharged.
Healthy lens:
- Evenly colored coating
- Clear and transparent
- No cracks or damage
Problem signs:
- Uneven coloring
- Cloudy or opaque
- Cracks or chips
If you notice any damage, take a photo and submit a ticket for guidance.
Check water connections
Section titled “Check water connections”- Verify water hoses are securely attached to the laser source
- Inspect cooling water inside the source through the glass tube
- Look for algae or dirt in the cooling water
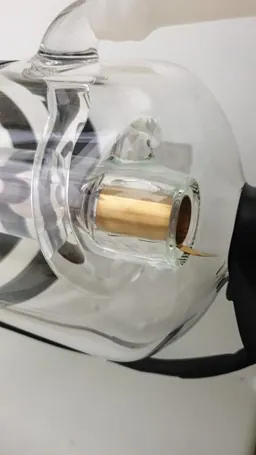
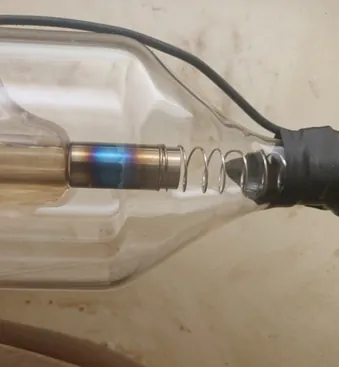
Check the cathode condition
Section titled “Check the cathode condition”The cathode is a metal shaft visible inside the tapered end of the laser source. It indicates laser source wear.
Cathode condition guide:
 |
 |
|---|---|
| Healthy: Even brass or silver colour (new source) | Worn: Dark discolouration (well-used source) |
If the cathode is discolored AND you’re experiencing power loss:
This indicates the laser source is degrading and may need replacement soon. Submit a ticket to assess whether a technician visit is needed.
After cleaning
Section titled “After cleaning”Once cleaning and inspections are complete:
- Reassemble any covers or panels
- Document the date for maintenance records
- Plug the machine back in and resume normal operation
Cleaning schedule
Section titled “Cleaning schedule”- Heavy use (production): Check every 2 weeks, clean as needed
- Medium use (creative): Clean monthly
- Light use (education): Clean every 2 to 3 months
Adjust based on dust buildup in your specific environment.
Related articles
Section titled “Related articles”- Cleaning mirrors
- Lens cleaning
- Water chiller maintenance
- Is my laser source worn out? - How to tell real wear from dirty optics or a cooling fault